We are so excited to introduce our 100% FREE SVG cutting file library here at Builderology and so today I thought I would share some helpful tips and tricks so that you can easily resize and customize all of our free downloads to create whatever your imagination can think of!
All of our SVG files are compatible with the majority of cutting machines. Whether you’re using a Glowforge laser cutter or other laser cutter or using computerized cutting machines such as the Cricut Maker or Silhouette Cameo – you can use our SVG files!
We also include printable PDF files of all of our cut file templates. Many cutting machine software programs will accept PDFs, but we generally include them as printable versions to use as templates for cutting things out by hand in case you want to try and project and don’t have a cutting machine available.
The SVG files are the easiest to customize, and you can resize them or even add text or other designs with them. Most cutting machine software programs allow you to resize the SVG in the cutting software itself, but you can always use an SVG editor such as InkScape (which is a free, open-source software) as well as Adobe Illustrator.
SVG stands for scaleable vector graphic, which means it can be easily scaled to any size you like. You can go super small, or super big – and you won’t lose any quality in the image itself.
Some cutting machine software can be a bit finicky in the way it handles SVGs and it also matters how you save the SVG itself.
When I’m working with files for Cricut or Silhouette that need to be a specific size or have a specific placement, I make sure that my artboard when I go to export is the same size as the material I’m cutting. This way, the placement and the measurements are easy to set in the Silhouette or Cricut software itself.
For example, I was recently doing a project where I needed to cut out hexagons that were a precise 1.5 diameter on a sheet of 8.5 x 11 kraft paper. In order to keep the size I needed, I made my artboard the same size as the sheet of paper. This way, when I imported the SVG file into the cutting machine software, I simply needed to resize it to 11 x 8.5 instead of trying to figure out the math for a hexagon all over again.
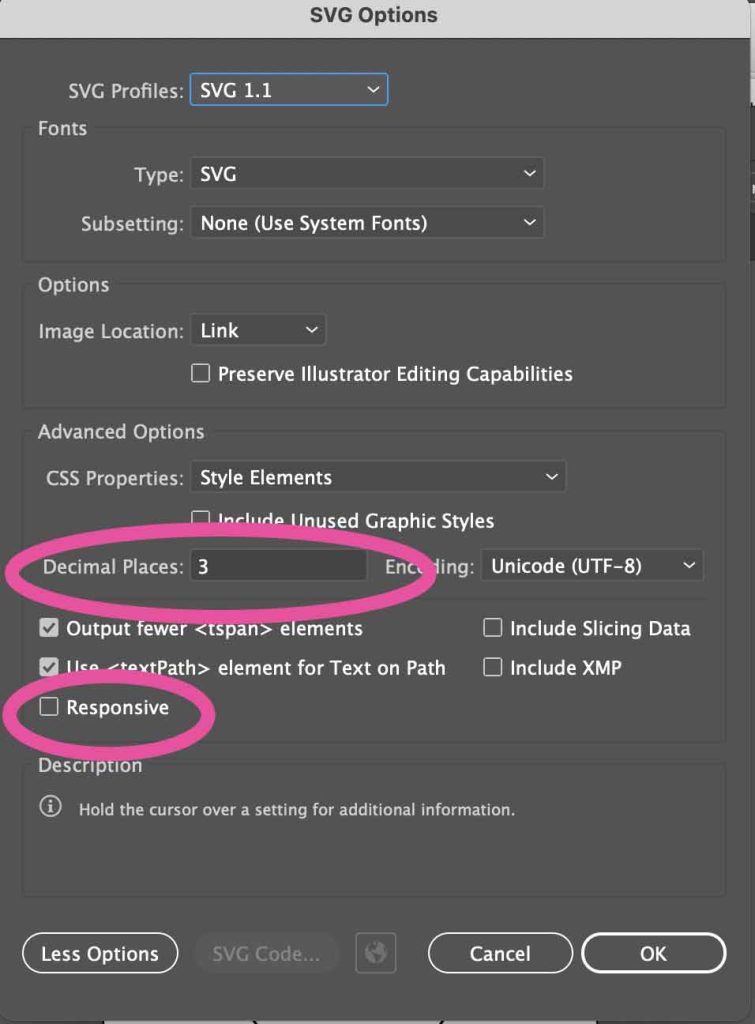
When you export an SVG from software programs like Adobe Illustrator, it is very important that you uncheck the box “Responsive” which is available when you open the “More Options” tab. You’ll also want to make sure you set the decimal points to 3 when you are working with inches.
Here is a screenshot of what these export options look like in Adobe Illustrator:

You can see where I circled the two places in hot pink where you need to be mindful of while saving – this will help make sure that when you go to import the SVG into your software that it will be easy to resize to the dimensions you need if you need a specific size.
In addition to resizing the graphics to fit the size you need, you may also want to make it so that perhaps the machine cuts out multiple shapes at once, or maybe you want to add some text.
Again, this is very simple to customize in most cutting machine programs, but if you need to adjust for this in a software program like Illustrator or Inkscape, all you need to do is copy/paste on an artboard the size of the material you will be cutting.
I hope this helps you in easily customizing the projects that you make using the free downloads from our SVG library and of course if you have any questions feel free to ask in the comments section below!
