
Building something out of cardboard? Here’s an overview of the many different ways you can connect and join cardboard!
We’ve had a ton of positive feedback about our decision to include a category for cardboard in this site as an affordable building material to use as an alternative to wood. (Thank you!)
We are super excited to bring all sorts of fun project ideas in the very near future but first, we need to cover the basics of working with cardboard if you are new to using this material for building things.
While cardboard can’t replace wood for certain things (like outdoor furniture or kitchen cabinets for example) – it does bring a lot of new possibilities for smaller projects, especially because cardboard is so easy to get for free.
So, to continue our series of working with cardboard, in today’s post, I want to talk all about different ways you can connect and join pieces of cardboard together.
Cardboard joinery techniques aren’t that much different from wood joinery techniques – but there are some neat products and options available that make it easy to build almost anything you can imagine with cardboard!
1. Cardboard Connectors
Cardboard connectors are small plastic pieces with grooves in them that pieces of cardboard can slide through easily. They come in a variety of different shapes, whether it’s a simple L shape for corners or even T shapes for connecting 3 pieces of cardboard together.
Cardboard connectors aren’t especially strong so you wouldn’t want to use them for anything you are planning to hold any kind of weight, but they really give you all kinds of freedom for making cardboard sculptures and for building things like models. They are an awesome supply to have for makerspaces!
This set of 60 clips by 3DuxDesign may seem small, but looks are deceiving and there are a lot of possibilities with them! Would I use them to build a fort? Probably not – I would most likely use tab and slot joints which we cover later in this post.
But they are great for making cardboard models + quickly prototyping projects you do want to make out of wood.
2. MakeDo SCRU Fasteners
You can’t use metal screws with cardboard, but these SCRU fasteners work just like screws would when you are connecting pieces of cardboard together.
Again, these aren’t exceptionally strong – I would definitely NOT use these for furniture or anything of that sort. However, they are definitely a great thing to have in your creative toolbox, especially if you have students or kids who are interested in building things.
In order to fasten the SCRU connectors to the cardboard, you will need a specially designed tool made by SCRU called a SCRU-Driver. It is sold separately from most of the SCRU packages, though some variations may include a mini-tool – make sure you read the product descriptions carefully!
3. Slot Joints
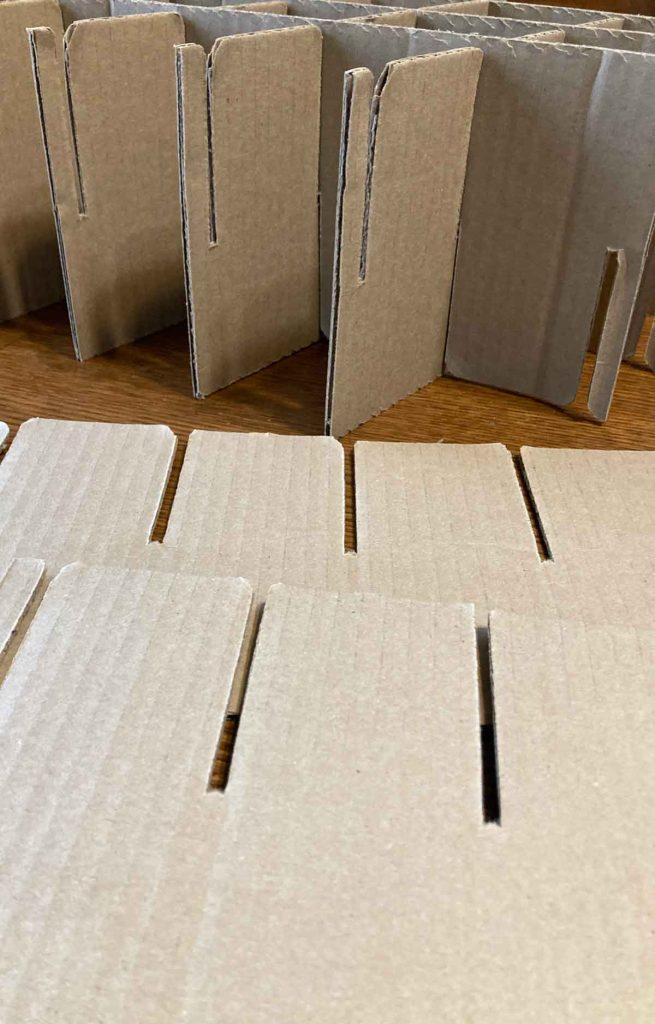
Slot joints are quick and easy to make. You often don’t need glue when using slot joints for pieces to stay together, but you will probably want glue if you want your joints to be permanent.
Slot joints work by cutting matching slots into two different pieces of cardboard. These pieces will then slide into each other, forming the joint.
It can be tricky sometimes to make your slots all the same size when you are cutting them. As we wrote about in our post with tips on cutting cardboard – use a ruler and a pencil to mark where to cut!
4. Folded Tab Joints
If you want to join your cardboard together without using any kind of hardware, folded tab joints are very easy to do just by making a few cuts in your cardboard pieces and then folding the pieces to create tabs.
You can either glue these folded tabs to the piece of cardboard you want to connect it to, or you can even cut out slots to create a space for the tabs to go through – we call those tab and slot joints and will explain those next!
Cardboard is not especially strong and folded tab joints are also not meant for holding any significant amount of weight – though they sure are great to use for making drawer dividers and that sort of thing!
If you want to use folded tab joints and give them additional strength, it’s usually best to work in several layers of cardboard – so after you create one joint, you will then create another tab joint to overlap that or glue on additional cardboard over the tabs.
5. Tab and Slot Joints
Tab and Slot joints are when you use tabs and slots together to join two pieces of cardboard together. Instead of inserting two slots to line up with each other, you simply cut out tabs to fit into the slots.
This is a great way to add additional elements to whatever you are building – especially when making cardboard sculptures and models.
To make a tab and slot joint, in one piece of cardboard cut away the edges so that you form a tab. On the other piece of cardboard, you’ll want to make a slot using your cardboard cutter.
Simply insert the tab into the slot! You will want to use glue to keep the tab securely in place in the slot, and you can always trim down the tab if it is sticking too far out of the slot after the glue dries.
6. Flange Tab Joints
Flange tab joints are what you’ll definitely want to use when you are trying to connect cardboard tubes such as tissue paper rolls to a flat piece of cardboard.
To make a flange tab joint, you simply make several small cuts around the base of a tube and then fold the pieces so that it creates flange.
Once you have those tabs cut and folded over to form the flange, it’s as simple as applying some glue.
Again, these types of joints as-is are NOT intended to hold or carry any significant amount of weight. To add additional strength and stability to the piece, you will want to cut out circle of cardboard to glue on top of the flange tabs.
7. Brad Fasteners
Brad fasteners are commonly used in scrapbooking and binding together documents, but they are also awesome for using with cardboard, especially if you want to create pieces that can move together easily.
You can get them at nearly any office supply store or the stationary section of most retailers, I’ve been pretty happy with the quality of ACCO brand brad fasteners and they are available in a number of different sizes.
8. Tape
In general, we don’t really recommend tape for joining pieces of cardboard together because, well…it’s sticky and not that strong. It’s really hard to get it where you want it without it also ripping up pieces of the cardboard if you try to reposition it.
You might be able to use tape with some success, but I am not good with tape and so I avoid it when I can. There ARE some types when you might want to use duct tape however and that’s when you are prototyping + designing something out of wood.
Cardboard Prototypes for woodworking don’t need any kind of long-term stability – they generally are just built to give you an idea of what something will look like or what size pieces of wood you might need. Tape makes it quick and easy to prototype your projects in no time.
9. Hot Glue
Like tape, I’m not the biggest fan of hot glue. It does the job quickly – but it’s not always the strongest method of keeping pieces together as the hot glue can break off over time.
Hot glue is also one of those things you wouldn’t want to let kids under the age of 13 use, as a glue gun gets VERY hot. Even older kids and teens should be supervised while using got glue with an adult in the same room.
Still, it’s worth mentioning hot glue as an option because it is very inexpensive and easy to get. The benefit of hot glue is that it sets very quickly, so you only need to hold the cardboard in place for a short time while you wait for the hot glue to dry.
There are many ways to join cardboard together, but we’ve found these ones work the best for nearly any kind of project you might be building. Do you have any methods of joining together two pieces of cardboard together we may have missed? Tell us about them in the comments below!
Thanks! I’m making my first Transformers cosplay out of carboard and fabric. I have tje sewing experience… I just needed the arts and crafts tips!